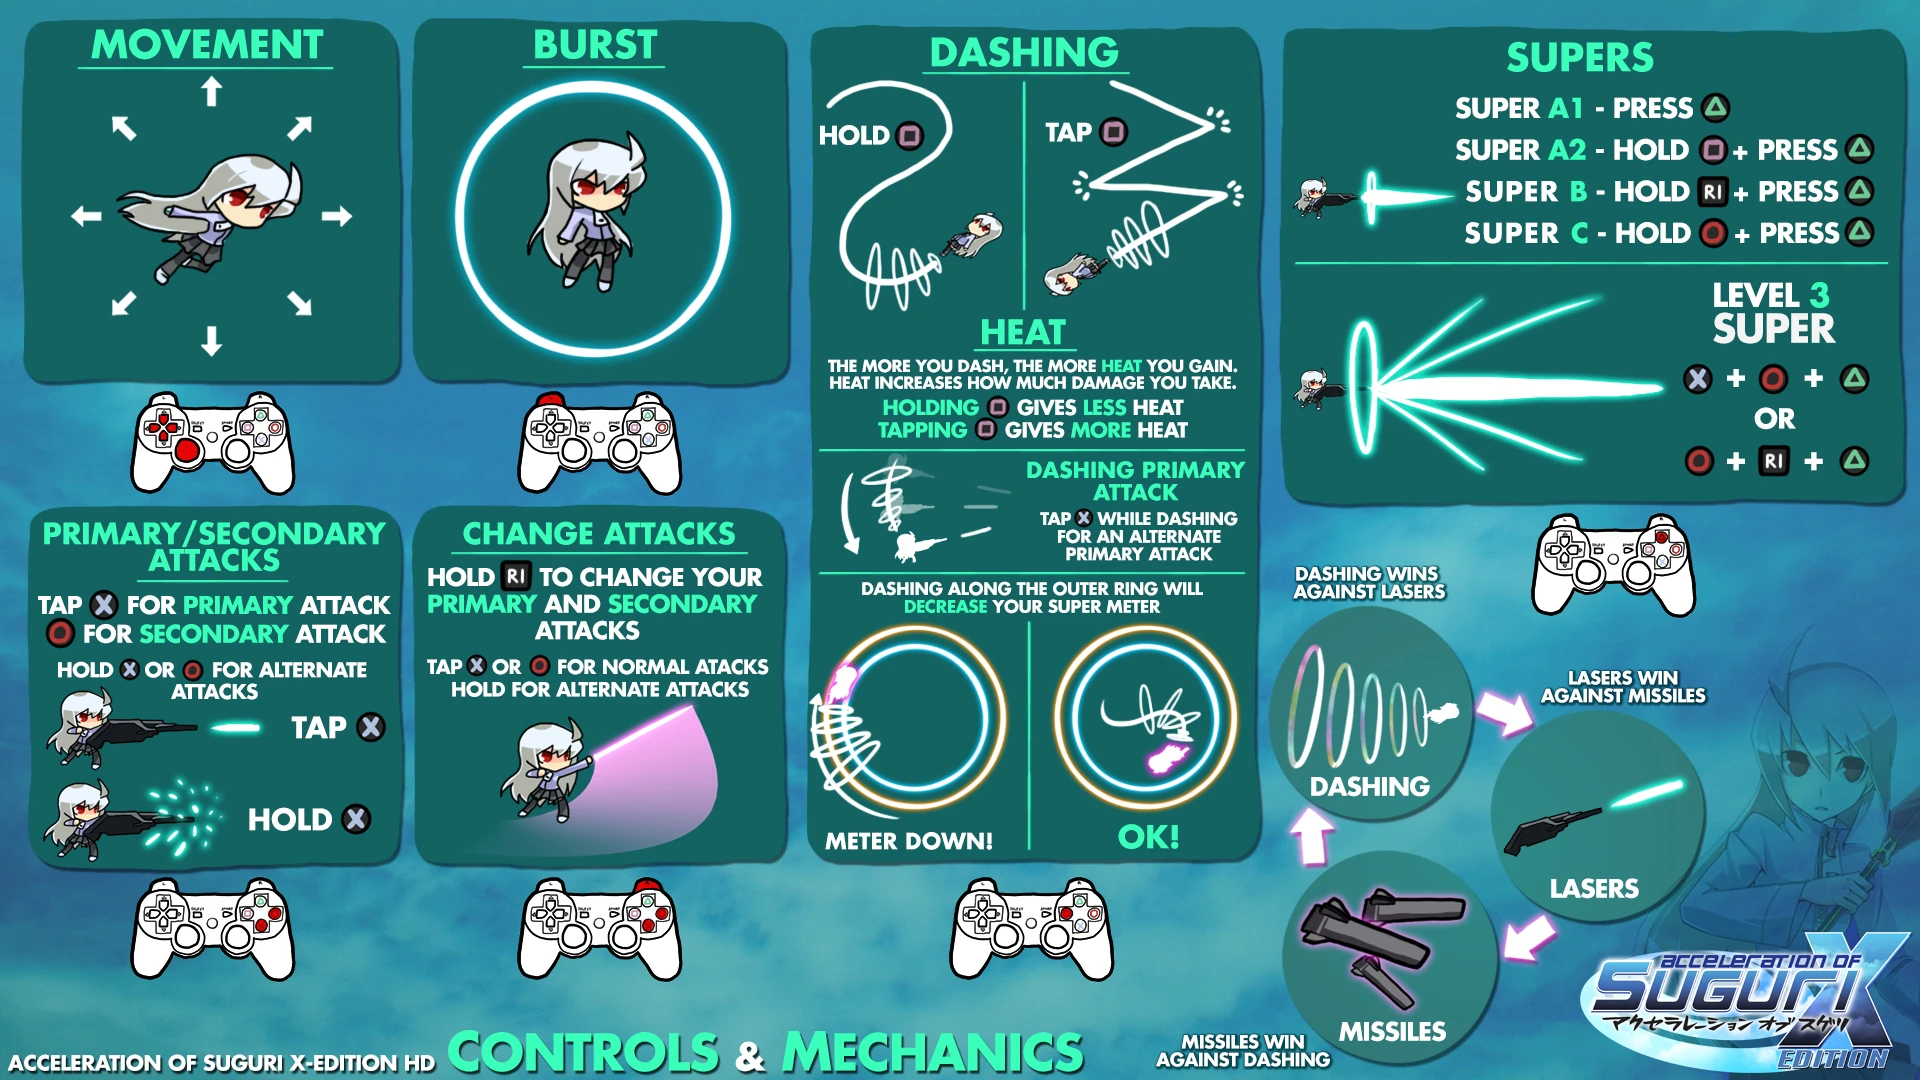
Much of the gameplay is similar to SUGURI, the single player action predecessor. There are a few key differences, such as the Circle edge of the arena decreasing your hyper energy, and the alternative inputs. Refer to the image for a brief explanation of the mechanics and controls.
Default Keyboard Controls for PC Version[]
- Z = Weapon A
- X = Weapon B
- C = Hyper
- V = Dash
- A = Special
- S = Shield
- Arrow Keys = Movement
- Space = Screenshot
- F10 = Quick-Pause
- Esc = Kills Application
Gameplay Basics[]
Acceleration of Suguri X Edition is a high-movement, versus bullet hell game. Thus, the idea of the game is to shoot your opponent while avoiding or neutralizing enemy shots. There's many dynamics in the game, such as building and using Hyper gauge, and managing your Heat gauge. In AoSX, you will always automatically face your opponent directly, and shots fired from your very wide variety of weapons will generally be pointed in the opponent's direction.
In order to become proficient at dueling you will need to learn some of the more important basics, such as:
- Zoning with different types of attacks in an attempt to control space or force your opponent to move where you want them.
- Dash Cancel to execute another attack more quickly.
- Attack Combinations to inflict further damage to your opponent.
- Building Meter from firing weapons, charging shots, and destroying ballistic projectiles.
- Using Meter to defend yourself with shields, cancel attacks into Hypers, and using Hypers to chain other attacks.
- Managing Heat to keep your Heat gauge low and force your opponent's Heat gauge up.
Attacking[]
Attacking is what you must do in order to defeat your opponent. However, learning how attacks work is important. For the most part, projectiles that are fired will build some Hyper gauge. But keep in mind that the opponent can also convert your shots fired to Hyper gauge for themselves.
Firing Weapons[]
While there are only two weapon buttons, there are many different types of button inputs and combinations that create many different kinds of attacks. Not all characters have each button combination, so refer to the character-specific sections to learn more about what your character does and does not have available.
Every game has a set of notations for the buttons to make it easier on players to convey attacks and movement. Below is the notation for AoSX. Many players may use different words such as "Primary" for Weapon A, "Secondary" for Weapon B, "Change" for Special, and "Super" for Hyper, but the notation will always remain the same.
- A: Tapped Weapon A
- [A]: Held Weapon A
- sA: Hold down the Special button and tap Weapon A
- [sA]: Hold down the Special button and then hold Weapon A
- Dash+A: Hold dash and then tap Weapon A
- B: Tapped Weapon B
- [B]: Held Weapon B
- sB: Hold Special and tap Weapon B
- [sB]: Hold Special and then hold Weapon B
- HyperA: Hyper A1, press Hyper. Requires at least one stock of Hyper.
- Dash+Hyper: Hyper A2, hold dash and press Hyper. Requires at least one stock of Hyper.
- sHyper: Hyper B, hold Special and press Hyper. Requires at least one stock of Hyper.
- HyperB: Hyper C, hold WB and then press Hyper. Requires at least one stock of Hyper.
- A+B+Hyper or sB+Hyper: Accel Hyper. This Hyper requires three stocks of Hyper gauge to fire and can be input in two different ways.
So, the most amount of normal weapons a character can have is 9, and the most amount of Hypers a character can have is 5. An example character with all 9 weapon types and all 5 Hyper types is Nanako.
Weapon Types[]
There are three basic types of attack in the game, and they are:
- Beam
- Ballistic
- Melee
- Beam: Laser beams trump ballistic projectiles. Lasers fired at enemy ballistic shots will destroy the ballistic projectiles and continue onward, building meter for the person who fired the lasers while persisting through. Beams are also generally very quick and will interrupt an enemy out of an attempted attack. Lasers can not be destroyed by the enemy, only passed through by dashing. Laser beams are the general purpose artillery in the game for most characters. They are good for forcing your opponent to raise their heat gauge from dashing, and good for building meter for yourself through their best use of destroying oncoming enemy ballistic shots.
- Ballistic: Ballistics will often beat melee and dashing opponents. Ballistic shots are the main strategic shots in the game, but they are a double edged sword. Ballistic shots, when destroyed, will reward the opposition with hyper gauge per projectile destroyed. Even so, they are completely necessary components to any battle, as they are necessary in order to prevent your opponent from endlessly dashing through your lasers. Most ballistic shots require a bit more aiming and timing and strategy in order to be used properly, but generally you want to put some ballistic on the screen in the path of the enemy.
- Melee: Melee can destroy enemy ballistic shots and snag dashers, though it generally will lose to both attack types unless used with proper positioning and timing. For example, while Sora's sA sword cut will generally run right into the enemy's oncoming lasers and ballistic, Sora's sB can slash down enemy ballistic and persist through, also potentially hitting the enemy. Melee attacks are generally for close-quarters combat and useful in attack combinations.
Defending[]
While a good offense can also be a good defense, there are other means of defending oneself, such as avoidance or shielding.
Dashing[]
Dashing has several properties that should be known for intermediate play. They are:
- Grazing: Enemy lasers can be dashed through. this is referred to as "grazing".
- Beam Charging: When dashing, you leave a trail of rings behind you which are used to convert enemy lasers into Hyper meter. It is important to note that simply dashing through the laser is not what causes your meter to increase, but rather it is the ring itself that collects Hyper meter for your Hyper gauge. When a laser connects with the ring you will hear a faint charging sound and a text-display saying "CHARGE" will appear. This distinction is important because it is possible to intentionally dash away from large sprays if lasers rather than across or toward them, which will leave a ring directly in their path and catch all of them.
- Ballistic Charging: This works similar to charging lasers, but there's two major differences. First, even though enemy ballistic shots can not be dashed through, you can still leave charge ring in their flight path, and when an enemy ballistic shot connects with the dash ring it will cause a Charge similar to when charging a laser. Most Ballistic shots can not be charged multiple times -- they can, however, be charged and then destroyed by your attacks for additional meter.
- Heat: When dashing you raise your heat in two different ways. Holding the dash button for a long graze will generally raise your heat gauge up gradually. Rapidly tapping the dash button to perform a quick series of dashes will very quickly raise your heat gauge. Heat effects the amount of damage you take by enemy weapons by a linear amount, so reaching 300% heat will cause quadruple damage to be incurred from enemy shots. To keep your heat to a minimum you will need to micro-manage your dashing a little bit by keeping and eye on your heat gauge and using normal movement or no movement to lower your heat.
Canceling Weapons[]
All normal weapons can be Hyper canceled, most normal weapons can be Dash canceled at some point (varies by attack and by character), and a few weapons can be chain canceled into other weapons. Some Hypers can also be chained into other Hypers. Canceling a very integral part of the game, especially learning how to dash cancel.
- Dash Canceling: Most attacks can be dash canceled as soon as the weapon is fired. More specifically, as soon as the attack becomes actively able to hit the opponent. For example, Firing Suguri's A then quickly pressing a direction and tapping the Dash button will result in a quick-cancel of that move. You can then stop dashing and fire the move again, then repeat the process for some quick firing lasers. Generally;
- Most laser-based attacks can be dash canceled immediately.
- Most ballistic-based attacks have some delayed cancel timing and can only be dashed once all shots are active.
- Most melee-based attacks tend to not have dash cancel points at all.
- Some Hyper attacks, usually ones that are lasers, can have dash cancel points in them, though this is character specific and not all of them do.
- Weapon Chaining: Some attacks have very specific cancel rules that allow you to cancel one weapon into another. This is generally character specific and usually involves melee-type attacks in some way. An example of this is Suguri's chain that allows you to do the following: sA, sA, A, B.
- Hyper Canceling: All basic weapons can be canceled into a Hyper attack at any point of the move, even before it has begun firing. But that also means it can be done after the weapon has fired. An example would be to use Sora's sB, A combo and then quickly cancel into a Hyper as soon as the laser is fired, normally this move would have a long recovery duration after fired, but the Hyper attack quickly cancels the recovery and both attacks continue to hit.
- Hyper Chaining: Some hypers allow you to chain one Hyper attack into another. This is usually limited to character specifics, although Hime has the most freedom.
Shielding[]
Extremely important for intermediate and advanced play is the Shield button. Shielding has some major effects;
- Invulnerability: Temporary invincibility to all enemy attack types for the duration of the shield.
- Bursting: Is simply the act of Shielding while being hit. Newcomers often shy away from the shield button at first as they feel it is a "waste" of meter since Hyper attacks come equipped with their own shield durations. However, the most critical difference is that shielding can cancel hitstun. That means if you're currently being hit by an enemy attack you can press the shield button and activate a shield instantly to prevent further damage. This is incredibly important to master as it can truly mean the difference between a win or a loss.
- Knockback: When in range of the Burst, enemies will have their attacks canceled, put into hitstun, and be forced away from you.
The Border[]
On the perimeter of the map appears two rings. This is the arena limit and you can not pass through the outer ring. When you Dash between the blue and orange rings your Hyper Gauge will decrease slowly, although regular movement incurs no such penalty.
- Grinding: Dashing up against the outer ring will quickly drain your hyper gauge and is the major reason to try and avoid being in close proximity to the "wall".
- Movement: The primary reason to avoid being near the wall, however, is to not have your movement limited by the wall itself. Movement plays quite a large part of dueling in AoSX, and having your movement restricted is a bad thing. Additionally, some ballistic attacks like Iru's will interact with the wall and detonate even if they do not touch the opponent, which can cause the explosion to inflict damage if you're within proximity of the blast radius. When you consider that the border is a circle, and you are inside it, being next to the wall restricts your movement to almost only 180°, which can be further restricted by enemy ballistic and melee.
Of course, this can also be used aggressively, in your favor.
- Cornering: While the arena is a circle and therefor has no corners, it's still possible to apply pressure to an opponent and get them close to the wall. This is in your benefit to do so because once the opponent is near the wall, their movement is limited. While strafing parallel to the opponent is generally a good idea to avoid lasers and direct shots, it can lead to being hit by melee and ballistic when in close quarters. This is because to get away from melee, for example, it'd be faster to fly directly away from the melee attack rather than across from it. But if the opponent can not move backwards due to the wall, their only choices are diagonally to the sides or forward, which is where your melee and ballistic attacks have higher success rates. Meanwhile, if your opponent's back is to the wall and yours is not, your movement is not limited so your opponent is at a direct disadvantage.